

SubSite Tiles for SharePoint Add-in Support
Instructions
Download and Installthe SubSite Tiles Add-in
Step 1: Purchase and Download the Add-in (Requires Tenant or Farm Admin permission level):
-
Go to the Microsoft Office Store.
-
Sign in using your Microsoft Account.
-
Select Add from the catalog to add to your account.
To Add the Add-in
Step 2: Go to the site collection or site level where you would like to use the Add-in. Add the Add-in from the Site Contents area, just as you would any other Add-in (Requires Site Collection Admin permission level or higher). Once added to Site Contents, anyone who can Edit pages can add the Add-in to the a page.
-
Navigate to Site Contents.
-
Select Add an App.
-
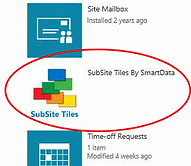
Navigate to the icon marked SubSite Tiles by SmartData and click on it to add the Add-in to your Site.
OR
Step 2: If you use an App Catalog, download it to your Tenant's App Catalog (Requires Tenant Admin permission level). Once added to the App Catalog, the Add-in will be available on the Add an App page.
-
Navigate to your Apps Catalog site.
-
Click the Apps for SharePoint list and click new item or drag-and-drop if using IE.
-
Navigate to the SubSite Tiles by SmartData and click on it to add upload.


Navigate to Site Contents.

Classic View

Modern View
Click on 'add an app' and select it from your Add-in library.
To Use the Add-in:
Navigate to SubSite Tiles by SmartData in Site Contents to add to Add-in to the site. The Add-in uses Search to automatically generate the most recent array of the site and all of the subsites immediately below that site. It can then be added up anyone with Edit permissions to any page.
Key Features:
-
Security trimmed: Display of site will be security trimmed and will only display sites where the current user has a minimum of ‘View’ permission.
-
Touch-friendly Navigation: The SubSite Tile display provides ‘Touch-friendly’ Tile images as navigation by providing hyperlinks to the sites that are shown.
-
Site Usage Information: Hover over a Tile image to display a description.
Optional: To Change the Tile Images
You will need to access the Tile Images library to make changes to tile images (Requires Site Collection Admin rights).
-
Select the link ‘Edit Images,' located at the top of the SubSite Tiles Add-in page. This link takes you directly to the ‘SubSite Tile Library’.
-
Upload new tile images to use, or replace current images in the library.
-
Once you have made all changes needed, the Add-in will automatically begin to use the new images in the library. Tile images are assigned to each subsite in the map based on 1) Site Level (top site level will be “Tile A”) and then 2) Alphabetically (i.e., Level 2, first tile working left to right will be “Tile B” then “Tile C”). Note: It is recommended that images be named in such a way that an Alphabetical sort will preserve the desired order of the Tiles as described.
Classic View

Modern View
Navigate to “Subsite Tiles by SmartData” and click on it to add the Add-into your Site.

Hover over a Tile image to display a description.

Upload new tile images to use, or replace current images in the library.